You’re standing in your backyard on a blistering Brisbane afternoon, watching your kids avoid the play area because it’s just too hot. That’s probably why you’re considering an outdoor shade sail in Australia, but you’re not sure where to start.
The questions pile up fast. What fabric actually blocks UV? Why do some sails sag after one season while others last for years? Here’s the thing: choosing the right shade sail is simpler than you think when you know what to look for.
That’s where we come in. Our team has helped hundreds of Brisbane homeowners choose quality shade sails that work. Visit MadeMinimal for an obligation-free quote.
This guide covers measuring, mounting, and maintaining, so you can get it right the first time. You’ll learn:
- What shade sails are and which fabric types work best
- How to measure accurately for a perfect fit
- Common problems and how to avoid them
- Installation and maintenance schedules
Keep reading to learn about shade sail solutions.
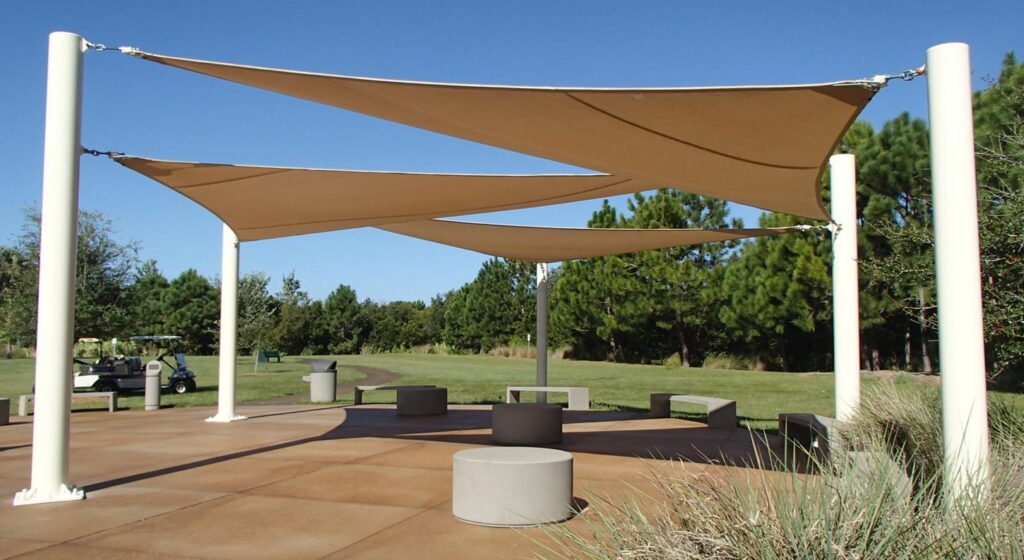
What Is an Outdoor Shade Sail?
Outdoor shade sails are tensioned fabric structures that block harmful UV rays and provide shade across decks, patios, pools, and car parks. They come in two main types: residential shade sails for homes and commercial shade sails for businesses.
But no matter which type you need, the performance comes down to your fabric choice and hardware quality.
Let’s break down what makes a good sail:
UV Protection Fabric Options
The best part about modern shade sail fabric is that you get both UV protection and style with colours that suit your home. They come in breathable HDPE fabrics like knitted polyethylene, which allows airflow while blocking the sun.
You can also get waterproof shade sails made from PVC for rain protection that keep areas completely dry and stylish.
Helpful Tip: Choose a quality fabric with a high UPF rating, like Commercial 95 or Rainbow Shade. This is because quality fabrics can block over 95% of UV radiation and resist fading under Brisbane’s intense heat and sun.
Marine Grade Hardware Components
Quality marine-grade thread and high-strength fittings mean your sail handles the Australian sun without rusting or failing. You need proper hardware because our environment’s humidity and salt air eat through cheap ones fast.
That’s why, when selecting hardware, look for marine-grade stainless steel in all connection points for maximum durability (unless you enjoy watching your investment turn orange and flaky within a year).
Now that you know what materials make a quality sail, let’s talk about getting the measurements right.
How Do You Measure a Shade Sail?
Accurate measurements for custom-made shade sails require recording distances between all attachment points, diagonal measurements, and post heights. Because if even one number is off, your sail won’t fit right or maintain proper tension.
Here’s how to measure correctly from the start.
Mark Your Attachment Points First
We recommend installing shade sails by marking posts on your deck, patio, or pool area first to ensure you position everything correctly. While marking, use a tape measure and actually write the measurements down.
For your outdoor space, choose strong fixing points that can handle tension. And don’t forget to plan attachment heights to get maximum shade coverage throughout the day. Nothing’s more frustrating than realising your sail only shades the garden at noon when everyone’s inside.
Measure Diagonals and Heights
What happens when you skip the diagonal measurements for your custom sail? Well, you end up with a sail that looks like a wonky kite. So to avoid this:
- Start with Perimeter Edges: Measure perimeter edges first, then all diagonal distances between every attachment point precisely.
- Measure Post Heights: For accurate fitting, record post heights from ground to eyebolt centre.
When ordering your new shade sail, double-check every measurement and coordinate to avoid expensive mistakes during installation.
Account for Hardware Allowance
Based on our experience, you should subtract 200-300mm from each edge measurement to leave room for tensioning hardware during installation. So deduct this amount per side for turnbuckles and shackles before ordering the size.
While too-small allowances prevent proper tensioning, too-large ones create excess fabric and look sloppy. It’s like buying curtains that drag all over the floor.
What Are Common Shade Sail Problems?
Common problems include sagging from weak posts, water pooling that causes mildew, and post movement from shallow concrete footings during shade sail installation.
Since most of these issues come down to cutting corners during setup, you should learn about these problems to avoid expensive repair work down the track.
This section covers the three common mistakes and exactly what causes them.
Sagging from Weak Mounting
Ever seen a sun shade sail drooping in the middle like a hammock full of rainwater? Yeah, that happens a lot when you don’t bury posts deep enough.
Depending on the size, bury posts 400mm-1200mm deep to handle the load properly. If you have a 3M size sail, aim for at least 800mm deep holes. The larger the sail, the deeper the footing needs to be to prevent that sad drooping look and permanent fabric damage.
Water Pooling and Mildew
Installing one corner lower than the others keeps your sail dry and prevents mildew in gardens and patios. The reason is simple: flat ones pool water, which eventually grows mildew and stretches the fabric until it damages stitching and requires expensive replacement.
Useful Tip: Install one corner a few degrees lower than the others to create a proper water runoff point. It prevents standing water from collecting and keeps everything clean year-round.
Post Movement in Ground
When posts aren’t buried deep enough in concrete, they slowly lean inward from wind load and elements exposure.
The problem starts small but gets worse over time. Insufficient concrete footings let posts shift gradually, which causes the shade structures to sag and lose tension. Once they start moving, the sail never sits right again.
The fix: bury posts deep with plenty of concrete for structural stability. Angling them slightly outward from the sail also helps. It counteracts the pull and extends the lifespan of your entire setup.
After understanding what can go wrong, it’s time to see how to keep your shade sail in good condition long-term.
How Often Should You Clean Your Shade Sail?
We recommend cleaning as regularly as every week for debris removal. Plus, every three months, for deep cleaning to keep your shade sail durable and avoid needing replacement. You may also want to inspect hardware every six months to catch problems early.
Follow this schedule to extend your sail’s lifespan:
Weekly Debris Removal
A quick weekly sweep of your driveway or caravan shade sail stops debris from building up and weighing down the fabric. So maintain this simple routine:
- Sweep leaves and bird droppings
- Use a soft broom to prevent debris buildup
- Check for small tears or loose fittings
Helpful Tip: Do this on the same day each week so it becomes a natural habit.
Quarterly Deep Cleaning
Once every three months, your sail needs a proper wash to maintain its protection and appearance. So, hose it down with mild soap, but never use high-pressure washers, bleach, or harsh chemicals that wreck the fabric.
Instead, use a gentle detergent and a soft brush. This gentle approach helps maintain the quality of the materials.
Inspect Hardware Every Six Months
Your hardware needs a thorough check twice yearly to catch rust, loose fittings, or fraying before they become expensive repair problems.
Here’s what to check: turnbuckles, shackles, posts, and all stitching. If you notice sagging, re-tension your shade sail to prevent water pooling.
All these checks take about 15 minutes twice a year (less time than you spend scrolling through your phone while waiting for your coffee).
Get The Best Shade Sail Right From the Start
Outdoor shade sails often fail if people skip proper measurements, use weak mounting points, or ignore maintenance schedules. But the issues are fixable with the right approach.
When you understand what works and what doesn’t, your shade sail becomes a lasting investment rather than an expensive mistake.
We’ve covered fabric options and hardware quality, plus accurate measuring techniques, including diagonals and allowances. We also walked through common installation mistakes and explained weekly debris removal and quarterly deep cleaning schedules.
Our team at Made Minimal will take you through each of these steps you need to create a durable, properly tensioned shade that lasts for years. You deserve an outdoor space that stays comfortable without constant repairs.